How Can We Help?
Prediction Exports
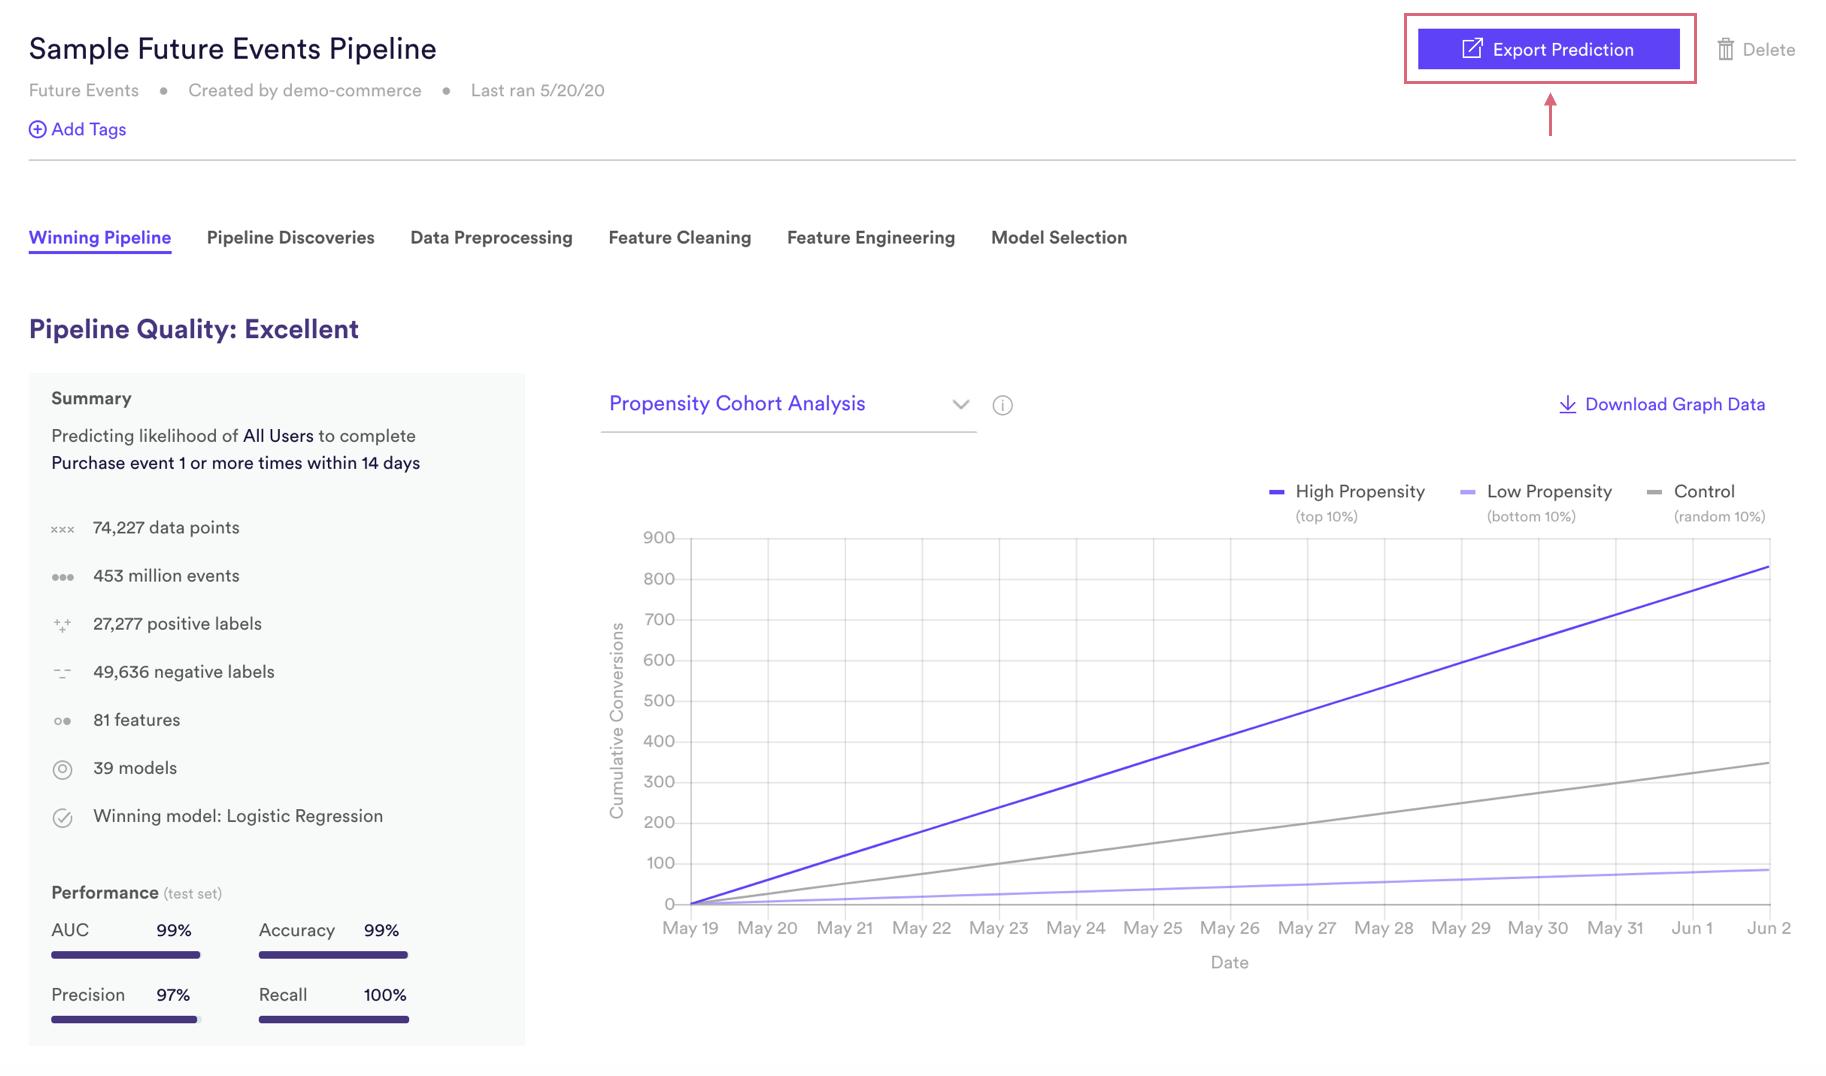
Even the most accurate Machine Learning Pipelines are only useful if they’re driving real value for your organization. That’s why Cortex makes it easy to connect predictions directly to your business workflows in a variety of ways. In this guide, we’ll walk through one of those ways: bulk exporting predictions from a Cortex pipeline.

What is a Prediction Export?
Prediction Exports allow you to create dynamic cohorts by filtering your pipeline’s predictions. For example, the below cohorts can be refreshed and exported anew every time your pipeline runs .
- “Export IDs for the top 1,000 users by predicted purchase probability”
- “Export IDs for any user with greater than 80% churn probability”
- “Export IDs for any home listing with predicted market value between $500k – $1.2m”
- “Export IDs and predicted conversion probabilities for every user active in the last 60 days”
The results from a Prediction Export can be downloaded to a CSV file either from the Cortex UI, or programmatically with the Pipelines API. If you’ve set up a third-party integration, you may also configure your Export to send results to a custom destination (e.g. Salesforce Audience Studio).
When should I use a Prediction Export?
Prediction Exports are best suited for “offline” use cases where predictions are deployed in batches rather than on-demand. A typical use case involves a recurring marketing campaign, like one of the below:
- User Conversion: Send promotional emails to the 10% of users most likely to purchase each week in order to nudge them toward purchasing from you rather than your competitors.
- User Retention: Send coupon codes to the 20% of users most at risk of churning each month in order to win back their loyalty.
- User Acquisition: Promote your mobile app to the 10% of users that are most similar to your existing mobile users.
How do I create a Prediction Export?
Imagine that an eCommerce company is planning to send a weekly newsletter to the users that are most likely to purchase within the next 7 days. Let’s walk through an example of how you might create a Prediction Export for this use case.
Step 1 – Apply filters
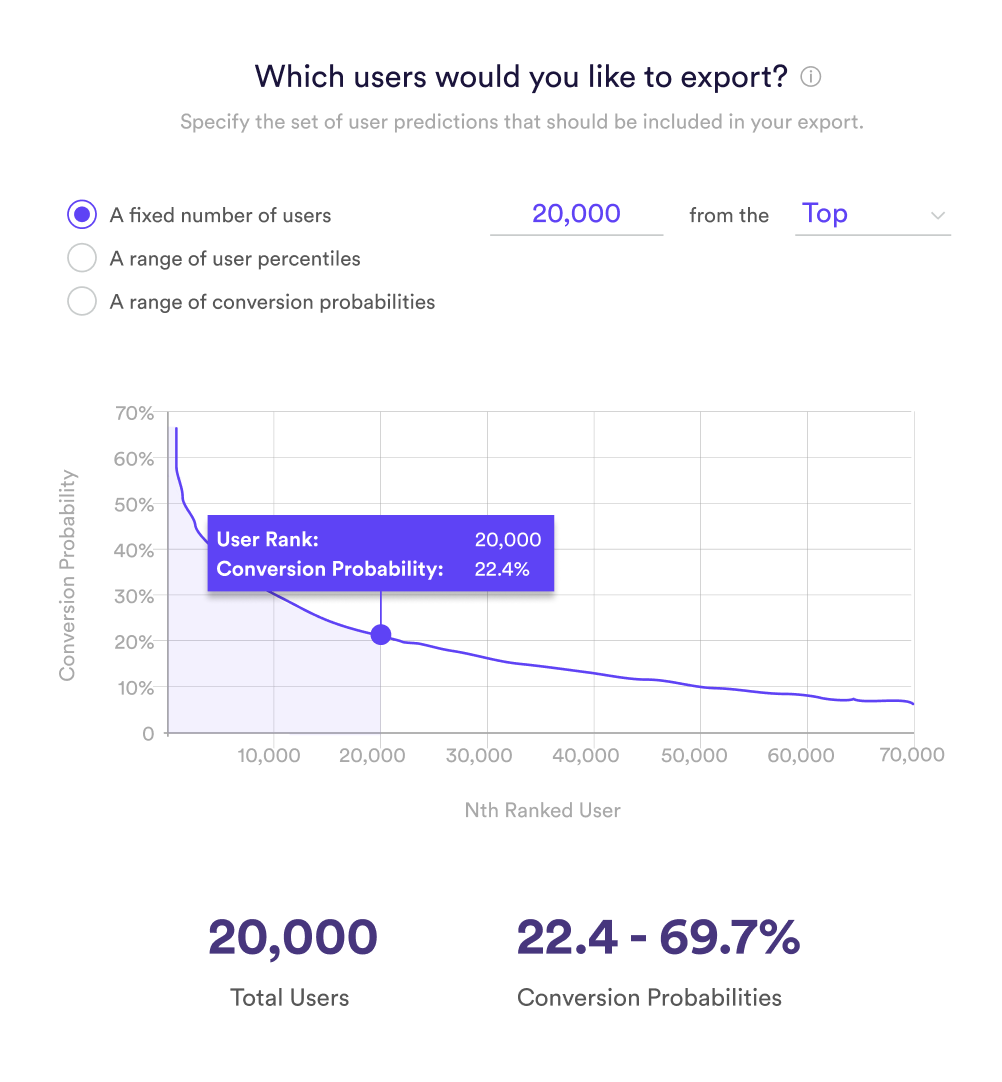
First, choose the number of IDs to export by applying filters to our pipeline’s predictions. For a Future Events pipeline, we can make this selection through one of three available export modes:
Number of Users: Enter the number of users that you’d like to export, and specify whether Cortex should pull from the top or bottom of the predictions list (e.g. “top 1m users”). The graph shows your pipeline’s prediction for the Nth ranked user, where a rank of 1 means that the user had a higher prediction than any other user.
User Percentiles: Enter a range of user percentiles in order to export a fixed percentage of users. The accompanying graph shows your pipeline’s prediction for the user in the Nth percentile. For example, if you select users in the 90th to 100th percentile, the top 10% of users will be exported. Note that ties are broken randomly so that no two users have the same percentile.
Range of Predictions: Enter a range of prediction values that you’d like to export (e.g. “users with conversion probability between 0-20%”). Any user whose prediction value falls within this range will be included. The accompanying graph shows the number of users within various bins of predicted values.
In our example, we’d have the budget to email ~20k users. To make sure that we’re efficiently targeting only those users who are primed to purchase, we’ll use the Number of Users export mode to select the top 20k.

*Note: the available export modes depend on which type of pipeline that you’re exporting from.
| Future Events | Uplift | Classification | Look Alike | Regression | Recommendations | |
| Number of Users | X | X | X | X | X | |
| User Percentiles | X | X | X | X | X | |
| Prediction Ranges | X | X | X |
Step 2 – Specify export schedule
After we’ve chosen which users to include, we can configure our Export in one of two ways:
Single-Use: Export a one-time CSV file containing filtered results from our pipeline’s latest predictions. This option is useful for testing, or if you want to analyze the predictions.
Recurring: Save results to a new file every time our pipeline generates updated predictions. This option allows us to productionize our pipeline’s predictions by accessing results that are always kept up-to-date over time.
For our example, we’ll select the Recurring option so that we can automatically refresh our list of newsletter recipients each week based on the latest predictions. Note that in order to create a recurring Prediction Export, our pipeline must also run on a recurring basis.
Step 3 – Choose file destination
Results from any Prediction Export can be downloaded either from the Cortex app, or programmatically through Cortex’s Pipelines API.
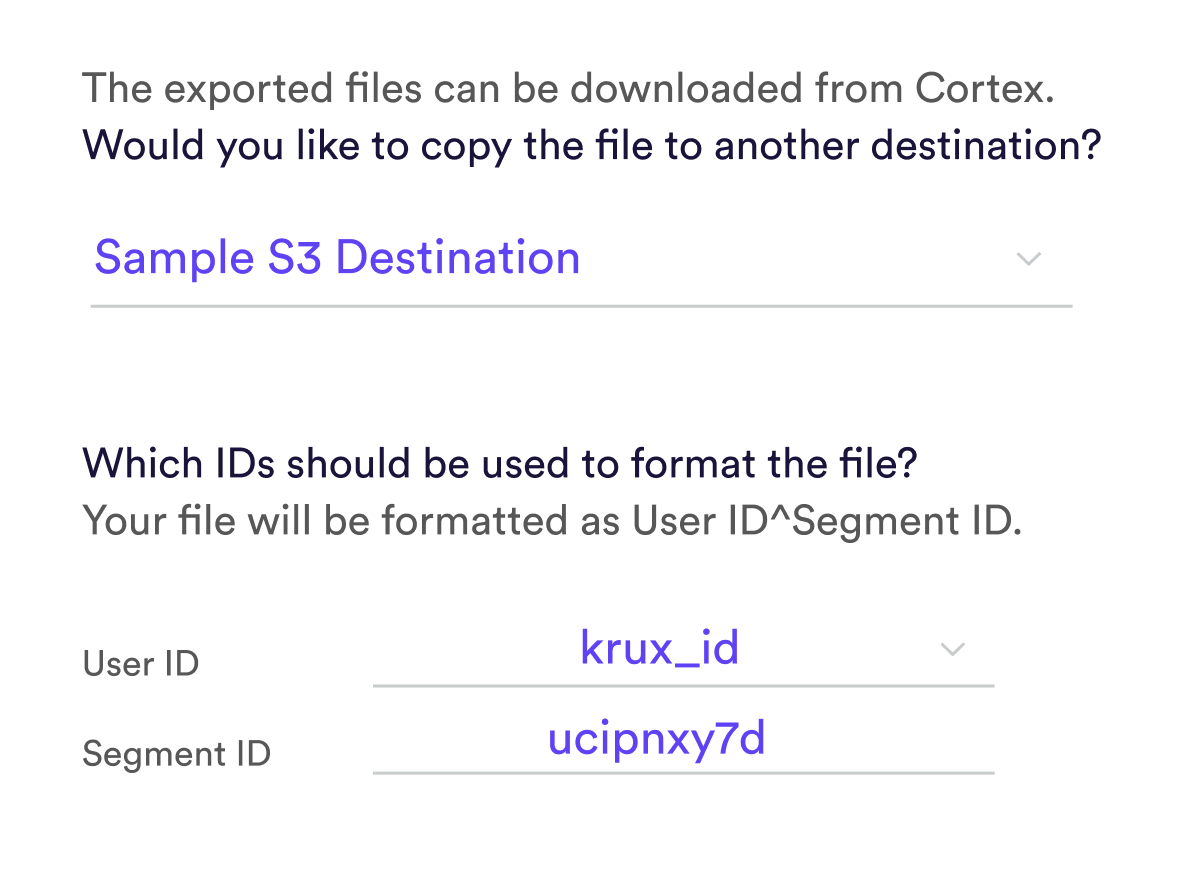
In addition, you may also choose to deliver results directly to a third-party platform that has been integrated with your Cortex account. To enable this option, first connect an Export Destination in the Data tab.
For example, say we’ve connected a Salesforce Audience Studio destination in order to export predictions directly to our Salesforce Marketing Cloud instance. If we select Salesforce as our destination and supply the necessary IDs, a copy of our exported prediction files will be delivered directly to Salesforce so that we can automate customer outreach in an intelligent way.

Step 4 – Other options
Specify any other optional settings that you’d like to apply. We’ll skip these in our example, but some options include –
- Add additional columns to your exported file. By default, only user_id will be included, but we could add other columns in order to further segment our users. For example, we could include each user’s predicted conversion probability, and/or its percentile relative to all predicted conversion probabilities (note that ties are broken randomly so that no two users have the same percentile).
- Include personalized content or product recommendations for each exported user_id. This would allow us not only to target the right users, but also to personalize the email we send to each. Note that this option is only available if you are sending a separate items feed in addition to your events data.
Step 5 – Save and export
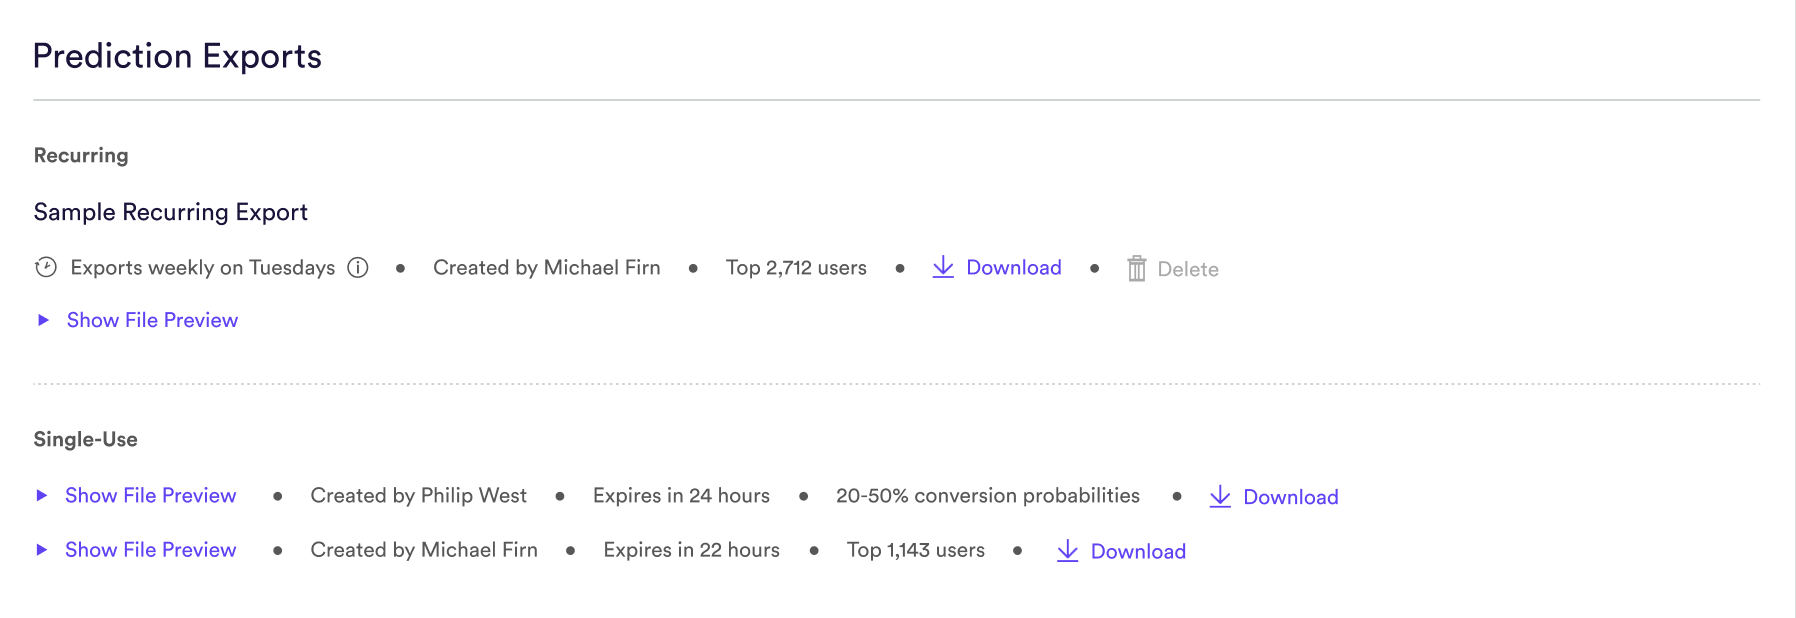
Once you’ve saved your Export, it will appear in a “Prediction Export” section beneath your pipeline. From here, you may download the exported data into a gzipped CSV file. Note that single-use exports will be archived after 24 hours to prevent your account from being cluttered with old test exports.

Related Links
Still have questions? Reach out to support@mparticle.com for more info!